
Attribute Groups
Attributes in feed® are organized into groups. An attribute must belong to one and only one group.
As a result of this, the first thing you see when you enter the Basic data for attributes is an overview of existing groups (side menu: Basic Data - Product - Attribute group).
Here you can create new groups by pressing the shortcut "c", or by clicking on the large round + icon in the lower right corner.
An attribute group consists only of a name (which can be translated into enabled languages) and an import code used by the API.


To work with attributes, you must first create or select the desired group, and then proceed to an overview of attributes for the chosen group.
Sort order
![]() This icon opens a list of attribute groups or attributes in sorted order. Here you can change the sorting order using drag & drop. This will determine the order in which they appear inside the product card in feed®
This icon opens a list of attribute groups or attributes in sorted order. Here you can change the sorting order using drag & drop. This will determine the order in which they appear inside the product card in feed®
Searches
![]() If you don't remember where to find an attribute, use search to quickly locate the Basic data for the desired attribute.
If you don't remember where to find an attribute, use search to quickly locate the Basic data for the desired attribute.


Attributes
When one is inside the selected group, one can create a new attribute by pressing the shortcut key "C" or the + icon at the bottom right (1.). Or one can edit an existing attribute by clicking on it (2.). In both cases, a detail window for the attribute opens where you register/edit the desired data.
All attributes can have the following flags:
- Read-only
This indicates that the field is read-only in the feed® portal, and is typically used if the field is owned and maintained by an external system and kept up to date via an API integration - Required
This is a purely visual tool to highlight that this attribute should have a specified value. If it does not have a value, it will be marked in red. - Rich text
This will support text attributes with some format options, such as header, links, bullet and numbered list, also, bold, italic, underline and striketrough.
You also get the optioin to "Edit as HTML". Here you can paste inn HTML code or write HTML tags directly.
Rich text cannot be limited on characters (Max length), since the HTML code/tags is also calculated as text.
Important: Keep in mind that any other HTLM text formatting might cause design issues when you export the data. System Attribute:
If this is checked, the feed API will not register a timestamp for changes to the attribute in connection with integrations that are only meant to synchronize updates. The attribute will otherwise function normally and can display values in API extracts, but it will not trigger an update to an external system if changes are made to an attribute with this checkbox selected.Examples of where this can be useful include:
Registering when a product was exported to a specific channel
Storing other metadata that should not mark the product as modified
An attribute can have one of the following data types:
- Text.
This is a pure text field where, similar to text fields that are a separate master data type, but grouped together with other attributes and normally used for shorter data fields that require free text values. You can specify a maximum length for text attributes, 0 = no limitation. - Universal text.
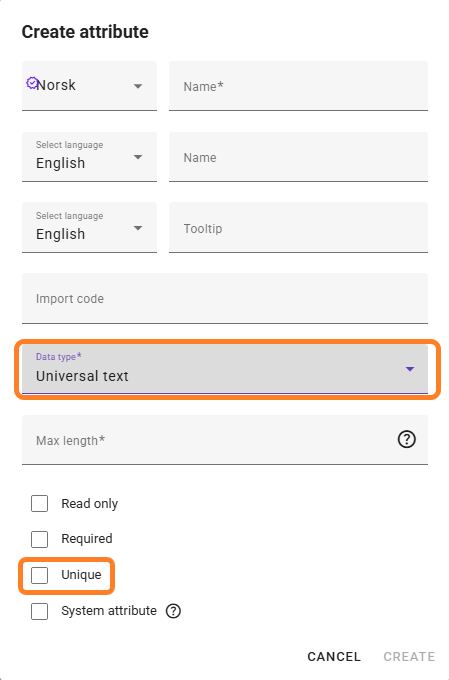
This is almost identical to regular "Text" above with one important exception. This attribute can/does not need to be translated into other languages. - Integer.
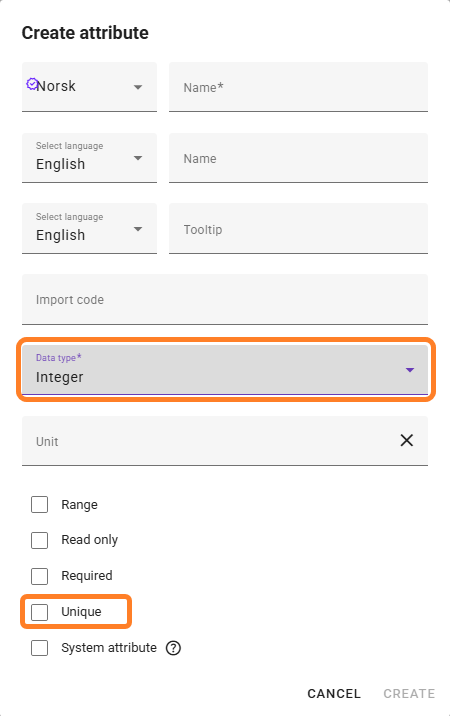
Can only be used to specify integer values, and it is possible to define it as a "range" attribute. This means that you get 2 input fields where you can enter from - to values as integers. - Float.
Similar to Integer above, but with support for decimals. - Date.
Used where there is a need to specify a date, as with Integer and Float, you can also specify a "range" here and can specify a from date and to date to define a period. - Checkbox.
This becomes a checkbox where practically there are 3 possible values. "undefined", "not selected/no", "selected/yes". For products where it has not been actively specified whether an attribute of this type is selected or not selected, the value will be "undefined". Exporters must take this into account and handle these correctly. - Dynamic Text:
This attribute allows you to combine multiple basic data fields into a single text field.
You can also insert any custom text or characters you want between the attributes you add—for example, a hyphen, field names before values, etc.
The attributes are placed in a list that you can drag and drop to change the order. - Data Register.
Where one wants to define valid values for an attribute and not just a free text field, we recommend using "data registry" or "multi-choice data registry" depending on whether there is only one or multiple valid choices that can be selected. Here, one must have defined a data registry first (see here for more information on data registry). - Data Register Multi-choice.
Same as "Data Register" above, but here you can choose multiple values as selected.
Additional information:
- On Integer and Float you get to add Unit to attributes so the value type is easily identified. This information can also be extracted in our API. To add or deactivate Units available, go to Basic data - Product - Unit.
- On Integer and universal text you get an additional option to set the attribute as UNIQUE.
- This requires that there are no duplicate values in feed on this attribut. For new attributes this will not be an issue, but for existing ones you will get a warning if you have duplicates. Then you need to do a product search on that attribute and checkmark for "has duplicates", then correct the issue before you can set the attribute as UNIQUE.
- Use this value only on values you know to be unique between products (such as GTIN or Industry article number. Vendor number could have the same ID if you have a lot of product from different vendors.


Dynamic Text:
If you choose the attribute data type "Dynamic Text", you can set it up in the following way:
- You select which fields you want to include in the dynamic text.
- If you want to insert custom text/characters into the list of attributes that will make up the text, you can do so using constant text (of the universal type),
or constant text that can have values in each of the languages you've activated in the feed.- Tip: If the dynamic field is going to be used for channel(s) that support HTML, it is possible to include HTML formatting in the custom fields.
You can insert opening tag in one field, closing tag in another, or tags with fixed text that you want to display before the next field is linked.
If you use HTML tags with a channel that does not support HTML, the HTML formatting will be displayed as-is at the destination.
- Tip: If the dynamic field is going to be used for channel(s) that support HTML, it is possible to include HTML formatting in the custom fields.
- The list of selected fields appears here.
- You can drag and drop these fields to change their order.
- You can click the copy icon on the constant text fields to avoid creating repetitive fields from scratch.
- You can delete fields if you've included something you don't want.
- A preview of the structure is displayed in this field.
- Cancel or save the field when it's ready.
- If you need to make changes to the field later on, this icon will appear in the attribute list. Clicking it will bring you back to "Edit Dynamic Text".

Product templates
When an attribute has been created it yet to be visible at any products. One very important step that is easily forgotten remains... One must specify which product templates this attribute should be visible on. An attribute that does not belong to a product template will in practice not be visible or accessible via API for any products... So if you have created a new attribute and do not see it on your products, this is most likely the step you have forgotten!
This icon ![]() behind each attribute opens the feature to select which product templates this attribute should be visible for.
behind each attribute opens the feature to select which product templates this attribute should be visible for.
On the left side, an overview of available product types defined in their feed® is displayed, that are not already selected. (See here for more information about product types)
On the right side (Chosen), the product types in which the attribute will be visible are displayed.
One can move desired product types between "Available" and "Selected" with drag & drop, or by clicking on desired product types and then on the right or left single arrow depending on whether you want to add or remove the attribute to a product template.
If you click on one of the the double arrows, ALL the product templates will be moved to Available or Chosen.

When you are happy with your Chosen selection of product templates, press "Update" to save the selection, or "Cancel" to exit the function without updating changes.
Change group
This icon ![]() behind each attribute allows one to move the attribute to another group if desired, click on this icon and then select the desired group to move the attribute to from the list that appears
behind each attribute allows one to move the attribute to another group if desired, click on this icon and then select the desired group to move the attribute to from the list that appears
